Full access zip bag - tutorial
I saw a tablet computer bag a couple of years ago that had a tab on both ends. I've wanted to make one ever since.
This is my version.
When it's unzipped, you have full access. The bag that I saw was flat (no flat bottom), and the tablet computer could slide right in because there was no restriction by the zipper.
This is how I made it.
This is what you'll need: Outside fabric, batting (if you want it quilted), lining, a zipper, and a scrap for the tab. The larger bag is 9"x 11" and the smaller bag is 7"x 9".
The first step is to quilt the batting to the outside fabric.
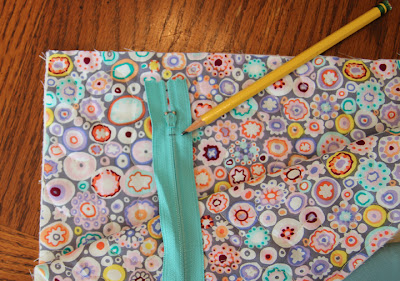
Now for the zipper. make a mark on the back of the zipper that shows on both sides when the zipper is open.
Place the zipper face down and curve it like this, with the pencil mark hitting the edge of the fabric 1/2" from the end.
Pin the layers like this
and sew with your zipper foot. I try to sew down the middle of the zipper tape because I like the zipper to show on the finished side. If you sew right next to the zipper teeth, then there isn't much of the colorful zipper that shows except for the teeth.
When you get 1 1/2" from the end, put your needle down,
and pull the zipper to the left.
Continue sewing through to the end.
When you turn it right side out, it will look like this.
Layer the other side like this.
See the pencil mark? Now sew the same way as the first side. I chose to sew on the other side of the zipper foot on the second side because I wanted to start on the same end of the zipper. I think this makes the zipper line up better.
Check your end result. If you're not happy with how the two sides match up, you can unpick and try again.
I unpicked and was happy with my second effort. It's like anything. It just takes practice, and this is my first try at putting in a zipper like this.
Lay the bag out like this. Outside fabric on one side and the lining on the other side.
Pin this intersection so it will match up perfectly. Fold the seam allowance toward the lining.
Sew all the way around leaving an opening in the lining. Don't forget to open the zipper first otherwise you won't be able to turn the bag inside out.
Cut all four corners off. I measured 1 1/2" square. This makes the bottom seams straight.
Fold the corners like this and stitch.
The bag now looks like this.
Turn the bag inside out through the hole that you left in the lining.
Pull the zipper out and push the lining in.
Trim off the zipper.
Add a fabric tab.
Pin the tab on and sew carefully. This really shows on the finished product.
Topstitch all the way around.
Stitch up the hole in the lining, and you're all done!
LOVE IT!!
Try one for yourself and let me know how it turns out!
Fabric details in case you're interested:
Outside fabric is Kaffe Fassett, Paperweight, by Westminster Fabrics.
Lining is Kona Cotton, Sage, by Robert Kaufman.
Batting is Warm & Natural.
The zippers were purchased in LA's fabric district for .25 cents each.


So cute! Great tutorial. Can't wait to try one.
ReplyDeleteGreat tutorial!!!
ReplyDeleteI cut my tabs 4" x 2.5"
ReplyDeletelove this
ReplyDeleteTried it, liked it.
ReplyDeleteIts wonderful blog really very nice site and blog facility.every title is very nice and very fatastic concept.Private Tutor Ocala Thanks for sharing the information.
ReplyDeleteWhen your favorite outfit doesn’t fit quite right, professional clothing alteration can make all the difference. Whether it’s adjusting the length of a dress, resizing a suit, or repairing everyday wear, skilled tailoring ensures your clothes look and feel perfect.
ReplyDeleteFor those searching for clothing alteration Melbourne, our expert team provides high-quality services tailored to your needs. From simple hemming and zip replacements to complete restyling, we handle every job with precision and care. We understand that well-fitted clothing not only enhances appearance but also boosts confidence.
If you’re looking for cloth alteration near me, our conveniently located service is the solution. With quick turnaround times and affordable pricing, we make it easy to keep your wardrobe in top condition. Trust our experienced tailors to deliver the perfect fit every time.